I have been working on MBAM deployment server 2016 recently and doing some tests in my lab. After one week i was able to successfully deploy mbam server, encrypt machine drive and escrow key to MBAM Database.
i followed the Microsoft Documentation on Deploy Mbam, you can find more details here.
https://support.microsoft.com/en-us/help/3046555/deploying-mbam-2-5-in-a-stand-alone-configuration
In order to successfully achieve this goal, please follow these steps accordingly.
1- Downoad the MDOP optimization pack from the MSDN
2- Create following User/Groups account in AD as follow:
| Name | User Accounts / Security Group | Description |
| MBAM-RO-SVC | User Account | Read only service account |
| MBAM-RW-SVC | User Account | Read/write service account |
| MBAM-IISAP-SVC | User Account | IIS application pool service account |
| MBAM Helpdesk Users | Security Group | Members of this group are granted read-only access to the helpdesk portal |
| MBAM Advanced Helpdesk Users | Security Group | Members of this group are provided with helpdesk access without the need to specify user and computer details for recovery |
| MBAM Report Users | Security Group | Members of this group have access to the MBAM SSRS reports |
| MBAM Database Read-Only | Security Group | Security Group for adding Read-Only DB members |
MBAM Database Read-Write |
Security Group | Security Group for adding Read-Write DB members |
Get more details about usser/group accounts from Microsoft Documentations:https://docs.microsoft.com/en-us/microsoft-desktop-optimization-pack/mbam-v25/planning-for-mbam-25-groups-and-accounts
Now we need to SetSpn on the MBAM-ISSAP-SVC
Open Powershell.exe and run these command as follow:
setspn.exe -S http/MBAM.yourdomain.suffix YourDomain\MBAM-IISAP-SVC
setspn.exe -S http/MBAM YourDomain\MBAM-IISAP-SVC
3- Deploy MBAM Windows server 2016 with Sql 2014
For my LAB i used windows server 2016 with SQL 2014(built in Reports)
Prerequisite: Create new windows server 2016 and following features, you can use powershell to install the Roles and Features as follow:
- Add-WindowsFeature -Name “Web-Server”, “Web-WebServer”, “Web-Common-Http”, “Web-Default-Doc”, “Web-Dir-Browsing”, “Web-Http-Errors”, “Web-Static-Content”, “Web-Health”, “Web-Http-Logging”, “Web-Performance”, “Web-Stat-Compression”, “Web-Security”, “Web-Filtering”, “Web-Windows-Auth”, “Web-App-Dev”, “Web-Net-Ext”, “Web-Net-Ext45”, “Web-Asp-Net”, “Web-Asp-Net45”, “Web-ISAPI-Ext”, “Web-ISAPI-Filter”, “Web-Mgmt-Tools”, “Web-Mgmt-Console”, “NET-Framework-Features”, “NET-Framework-Core”, “NET-Non-HTTP-Activ”, “NET-Framework-45-Features”, “NET-Framework-45-Core”, “NET-Framework-45-ASPNET”, “NET-WCF-Services45”, “NET-WCF-HTTP-Activation45”, “NET-WCF-TCP-Activation45”, “NET-WCF-TCP-PortSharing45”, “RDC”, “WAS-Process-Model”, “WAS-NET-Environment”, “WAS-Config-APIs”
SSL Certificate: is optional if you like to add to your MBAM windows server in IIS manager
- Open the Certificate Authority console
- Right click on Certificate Templates and click on Manage;
- Right click on the Computer template and click on Duplicate Template
- Give your template a name
- Define your supported Operating System
- In the Subject Name tab select the option “Supply in the request”
- On the Security tab, add your MBAM server or a security group containing your MBAM servers
4- Install SQL 2014
As we install all the prerequisites on the server role/features, its time to install the SQL. Start the installation of SQL 2014, but make sure when you reach this point, select appropriate item as follow in Screenshot:
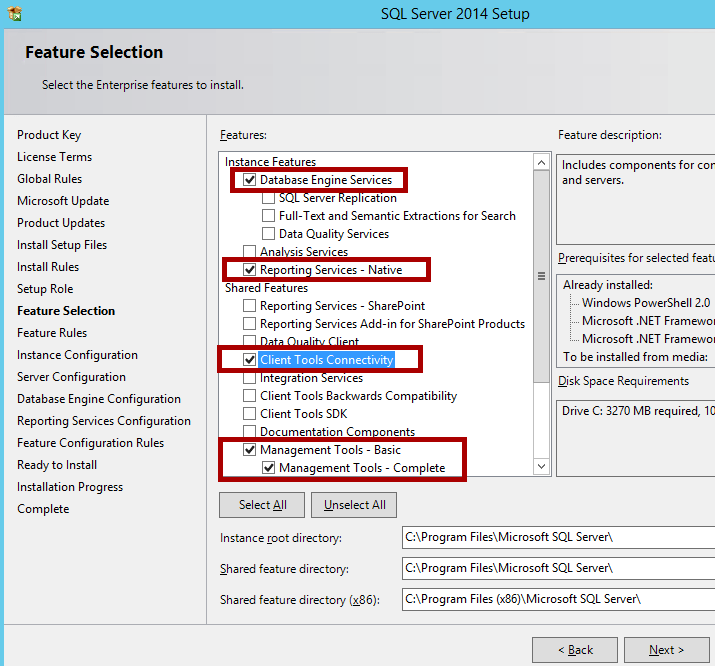
The reason i choose SQL 2014 it comes with Reporting Services, Management. If you install the latest version of SQL you need to Download and install each individually.